Showing posts with label Tutorial. Show all posts

Where to Get Professional Diploma in Forensic Quantum Analysis

admin 00:07 Add Comment
For Planning Engineers and Project Managers, where to Get a Professional Diploma in Forensic Quantum Analysis? It will be very helpful for both Planners and PM to  have a great knowledge of Delay Analysis for the Application for Extension of Time.

The College of Contract Management offers a Professional Diploma in Forensic Quantum Analysis. This one-of-a-kind live online course will give you all the skills you will need to progress as a Forensic Quantum Analyst within the construction industry.

Delivery:

This programme is delivered through live online lectures which allows you to get a British education from wherever you are in the world. The lectures are held at weekends to fit around your work schedules, as well as being recorded so that you have the option to catch up or re-watch at any time through Moodle (virtual study platform).
 
Where to Get Professional Diploma in Forensic Quantum Analysis

What's Covered:
  • Quantum Determination
  • Quantum Analysis
  • The Use of Forensic Quantum Analysis by an Expert Witness

Firstly, at the beginning of a large-scale project, contracts are exchanged between both employer and contractor in order to help everything run smoothly. The agreements set out clear budgets, completion goals and construction requirements. Likewise, the start of the project is the phase of planning is where all contractual obligations should be laid out. By using dedicated software programmes, both contractors and employers will have a strong foundation and timeline for steps to complete the project – known as the ‘as-built’ phase. This software is also useful when claims and disputes do arise.

Quantum analysts can use these programmes to reconstruct where financial errors may have begun. Likewise, with chronologically dated software progress of a project, it is much easier for a quantum forensic analyst to make financial calculations.

Email enquiries@theccm.co.uk for further information.
How to Extend Authorized Stay in the Philippines

How to Extend Authorized Stay in the Philippines

admin 00:48 Add Comment

 How you can get EXTENSION OF AUTHORIZED STAY BEYOND 59 DAYS in the Philippines?

A foreign national whose stay will exceed fifty-nine (59) days should secure extensions of stay with the Bureau of Immigration.

You can get it at the BI Main Office. Other Immigration Offices (Click here to see the list of offices authorized to process this transaction).

What do you need?
1. Checklist TVS-C-VE-2016 with complete documentary requirements

2. Application Form TVS-CGAF-VE-2016

3. Additional Information on Applicant's children (if needed)

How to Apply?
  1. Secure the CGAF from either at the Public Information and Assistance Unit (PIAU) at BI G/F Main Office or from the official BI Website.
  2. Submit the completely filled-out application form and attachments together with the passport to the frontline officer.
  3. If the applicant has no derogatory records, a BI Clearance Certificate shall be issued. Otherwise, the applicant must proceed to the Verification and Certification Unit for Clearance.
  4. Get the Order of Payment Slip and proceed to Cashier for payment.
  5. Pay the fees and get the Official Receipt.
  6. Submit the Official Receipt with the application form, attachments and passport to the receiving/assessment Officer.
  7. Claim the passport stamped with the requested extension of stay.
For more information on the amount of fee for processing, kindly visit the official Bureau of Immigration Website, HERE!

How to Save your VHS with NERO Recode Stick

admin 00:35 Add Comment
If you have Betamax and VHS and you wanted to save your video and digitize, you're on the right track with NERO. The analogue inputs allow you to connect various devices such as video recorders, record players, camcorders or cassette decks. You can play the digitized material on all your digital devices, whether smartphone, computer or TV.
 
Digitize your analog treasures:

The Nero Recode Stick helps you bring your personal memories, recorded movies or records and cassettes into the 21st century.

Easy to connect & versatile!
 
Convenient: with Nero Video you can edit and optimize your digitized videos right away!

How to Save your VHS with NERO Recode Stick


Easy to connect!
  1. Connect Recode Stick to computer via USB
  2. Connect Recode Stick to analog video source
  3. Start analog video source
  4. Record with Windows "Camera App"

How to get your GCash Fully Verified Tutorial

admin 18:27 Add Comment

What are the benefits of verifies Gcash account. You will not be limited on using all Gcash features when your account are fully verified. Here's the tutorial on how to Learn the step-by-step process of how to get fully verified. A Fully Verified GCash Account assures the legitimacy of your account because of the submission of personal documents to support proof of your identity as well as a selfie scan for enhanced security. Having a Fully Verified account also allows you to access all the features and services of GCash and have increased wallet limits.

If you are a Filipino citizen at least 18 years old with a PH-based SIM, follow the steps below to fully verify your GCash Account.

1. On your GCash app, Tap profile.
2. Tap verify now.
3. Tap get started.
4. Prepare your valid government ID and tap next.
5. Make sure you are selfie-ready and tap next.
6. Prepare all your personal information and tap next.
7. Enter the 6-digit authentication code sent to your GCash registered mobile number and tap next.
8. Inform your birthday and confirm if you are a Filipino citizen. Tap next.
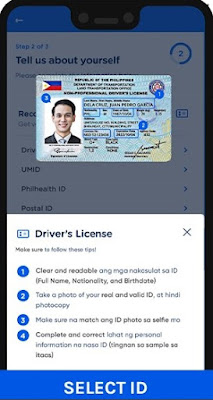
9. Tap the valid government ID you wish to submit for verification.
10. Read the following tips and tap select ID.
11. Scan your ID.
12. get ready to take a selfie scan. tap next.


How to get your GCash Fully Verified Tutorial
photo credit: GCash


13. Take your selfie scan.
14. Review all your information and tap next.
15. You will be led to a confirmation page to confirm your application to be fully verified.


PNB Tips against internet's dangers

admin 17:57 Add Comment

 PNB gave some tips on how to safeguard yourself from the internet's dangers. The internet has made shopping, banking, and connecting with loved ones more accessible and convenient.

However, despite its many benefits, the internet has a lot of dangers.

Here are ways we can make our banking experience safe:

1. Update your devices' software frequently.

2. Download files and apps from reliable sources like Google Play and App Store.

3. Adjust your privacy settings the limit the information you are sharing online.


Don't keep your guard down and always be alert to online banking safety use.

Tutorial on How to remove GCash Link in the App Store

admin 18:20 Add Comment

 How to remove GCash as you payment method in the App Store? Here is tutorial of how to remove GCash as your payment method in the App Store.

1. Open your Settings.

2. Tap your Apple ID.

3. Tap Payment and Shipping

4. Tap Gcash.

5. Tap Remove Payment Method.

6. Tap Remove. 

Tutorial on How to remove GCash Link in the App Store

How do I update my payment method to GCash via the App Store?

1. Open your Settings.
2. Tap your Apple ID.
3. Tap Payment and Shipping.
4. Tap Add Payment Method.
5. Tap GCash then Tap Login to GCash.
6. Enter your MPIN.
7. Tap Authorize
8. Enter the 6-digit authentication code sent to your registered mobile number.
9. Tap Next.
10. Tap Authorize.

OFW Pass App Invalid OTP How to Fix

admin 17:01 Add Comment

How to Register to the OFW Pass App and How to Fix Invalid OTP message during registration. I have seen  a lot of comments from our Kababayan OFW having trouble on registration with OFW Pass App. Some have successfully registered already and you can ask them at the DMW Facebook page via comments.

GOOD NEWS mga Kabayan sa Pilot Test Run ng DMW Mobile App at OFW Pass!

Sa mga OFW na nasa SAUDI ARABIA, UAE, SINGAPORE, at HONGKONG maari nang i-download ang DMW Mobile App sa inyong mga cellphone.

Sa Android na cellphone i-download ang app mula sa Google Play Store. Kung iPhone ang iyong cellphone i-download naman mula sa App Store ng Apple.

Para makapag-apply ng inyong OFW Pass, ito naman ang accepted na IDs para sa Visa requirement:
1. KSA – entry Visa, Valid IQAMA
2. UAE – Residence Card or Emirates ID
3. SG – Work Permit SPass or EPass
4. HK – ID Card, Permanent ID Card

OFW Pass App Invalid OTP How to Fix

Abangan ang mga iba pang abiso tungkol sa DMW Mobile App at OFW Pass at kung maaari nang ma-download sa lugar ninyo.

Tandaan, lahat ng opisyal na abiso tungkol sa DMW Mobile App ay makikita lamang po sa DMW Facebook page at Messenger sa https://www.facebook.com/dmw.gov.ph at sa Twitter #DMWPHL

Para sa iba pang tanong tungkol sa DMW Mobile App at OFW Pass makipag-ugnayan sa amin sa DMW.

e-mail: ofwpass@dmw.gov.ph
FB at Messenger: https://www.facebook.com/dmw.gov.ph  
WhatsApp at Viber (call | SMS):
+63 908-326-8344
+63 927-147-8186
+63 920-517-1059

Salamat at ingat palagi Kabayan!

How to link your GCash to the Grab App

admin 16:07 Add Comment
Pay Online is only for Fully Verified GCash users. A Fully Verified GCash Account assures the legitimacy of your account because of the submission of personal documents to support proof of your identity as well as a selfie scan for enhanced security. Having a Fully Verified account also allows you to access all the features and services of GCash and have increased wallet limits.

Follow the steps below to learn how to link your GCash to the Grab App:

1. Open your Grab App and Tap Account.
2. Tap Payment Methods.
3. Tap Add Payment Methods.
4. Tap Gcash.
5. Login using your GCash Number and Tap Next.

How to link your GCash to the Grab App
credit:GCash


6. Enter the 6 digit OTP sent to your mobile number and tap next.
7. Enter your MPIN and tap next.
8. Tap Link.
9. You will be led to a page that confirms the successful linking of your GCash Wallet and your Grab app.

How to pay using GCash in the Grab App:
1.When paying on Grab, tap the options below Payment Details.
2. Tap Gcash.
3. Your GCash funds will be put on hold while your trip/delivery is ongoing. In the case your trip/delivery gets cancelled, your funds will be automatically refunded back to your GCash account. You will be notified via push notification and in-app inbox.

How to Change Username in Macbook (OSX)

admin 19:58 Add Comment
I have change the username in my macbook and suddenly it seems like I just opened my macbook for the first time as I was prompted to enter all my account details again. And even my files from my old account suddenly gone. I am sharing via video tutorial on  how I managed to recover my files from my previous account.

Meanwhile, here's on how to change user account on Macbook

Your user account name and home folder name are established when you create a user account on your Mac. You can change them.

Each user account in OS X has a full name and a short name (account name). You can view these names from the Users & Groups pane of System Preferences, and you can use either name to log in to your Mac.

How to Change Username in Macbook (OSX)


Change the full name of a user account

A user's full name can be changed by that user or an administrator. The full name doesn't need to be the same as the account name or home folder name.

OS X Yosemite or later

  1. Choose Apple menu  > System Preferences, then click Users & Groups.
  2. Click the lock  button, then enter an administrator name and password. 
  3. From the list of users, Control-click or right-click the user that you want to rename. Choose Advanced Options from the shortcut menu.
  4. Change the name in the “Full name” field, then click OK.

Tips on How to Ask Google to Index your Blog Post in just a minute

admin 18:24 Add Comment

Page indexing is very important on if you want your post to appear on Google Search and other search engines like Bing. Submitting a site map and doing all the coding is tedious and sometimes complex, especially for those who just started blogging. Being indexed by Google and Microsoft Bing will determine how your page and post will be searchable and appear on Search Engines. Post not indexed by Google cannot be served on Google.

Here is the step-by-step tutorial on How your post can be indexed by Google.

1. Go to Google Search Console. Just type it in Google Search and you will be prompted on the page.

Tips on How to Ask Google to Index your Blog Post in just a minute

2. Copy your blogpost URL.

3. Paste it into the "URL Inspection" tab and press Enter on the Keyboard

4. Google will then Analyze your blog post URL.

Google Index your Blog Post in just a minute

5. When Google said that "URL is not on Google".

6. Click "Test Live URL" on the right side of the page.

Tips on How to Ask Google to Index your Blog Post in just a minute

7. Google will then process a live test of the URL.

8. Google will tell you "URL is available to Google"

If it gets indexed and selected as canonical, it could appear in Google Search results with all relevant enhancements.

9. Click Request Indexing and Google will index your page in just a matter of minute. URL will be indexed only if certain conditions are met

How to ask Bing to Automatically Index your Page

admin 22:29 Add Comment

How can you make Bing Webmaster Tools automatically index your Website or Blog? Here is the tutorial on How Bing can automatically index your page. Instead of sending the URL of your page manually, you can use IndexNow instead.

Use Bing's "IndexNow" which is the industry standard that helps you easily notify search engines about your latest site content.

Easy to use protocol that websites can call to notify Bing whenever website contents on any URL is updated or created allowing instant crawling, and discovery of the URL

Generate API Key

API key is needed to match the ownership of the domain along with submitted URLs; should be of minimum 8 characters.

How to ask Bing to Automatically Index your Page


Host API key

Host your API key on the root directory in txt format. This will help in verifying the ownership of the submitted URLs

Submit URLs with parameters

Webmasters can submit individual or bulk URLs. Just submit your key location as URL parameter.

Get details on how many submitted

URLs submitted and discovered by Bing can be seen in the Bing webmaster Tools portal (sign-in required)

Verification of host on API key

You will need to host your UTF-8 key file at

https://www.example.com/6459f6b48ed44e85ba3253f0d0cae212.txt

with the key 6459f6b48ed44e85ba3253f0d0cae212 in the content of the text file.

Sending of URLs

https://www.bing.com/indexnow?url=http://www.example.com/product.html&key=6459f6b48ed44e85ba3253f0d0cae212

SUBMITTING SET OF URLS VIA AN HTTP REQUEST

To submit a set of URLs using an HTTP request, and issue your POST JSON request to the following URL:

How to Submit Sitemap to Google for Crawling and Indexing

admin 17:38 Add Comment

Have you ever wondered why you only have a few visitors on your website or blog? If your page is not indexed it cannot be served on Google. Before my pages were only viewed 3 to 4 times daily but when Google started indexing my pages, tons of visitors are flying to my page.

A page is indexed by Google if it has been visited by the Google crawler ("Googlebot"), analyzed for content and meaning, and stored in the Google index. Indexed pages can be shown in Google Search results which will result in more visitors to your site.

To submit your sitemap to Google, visit Google Search Console and click Sitemaps. Enter your Sitemaps and click Submit. Google will then analyze the type of sitemap and discovered pages and discovered videos. One of the Google crawling engines crawls (requests) the page. The terms "crawl" and "index" are often used interchangeably, although they are different (but closely related) actions. 

Watch our tutorial on How to Submit Sitemap to Google for Crawling and Indexing.

How to pay your Water Maynilad Bill using GCash

admin 17:46 Add Comment

Yesterday, I made a tutorial on how to pay your electric bill via the GCash app. Today, I will teach you on how to pay your Water bill via Gcash.

Here's the step-by-step tutorial on how o pay your water bill via Gcash app.

1. Install GCash app via Google Pay Store or Apple Store.

2. Click Bills, then Water Utilities

3. Select Maynilad

4. Enter the amount you have to pay

5. Enter Account Number

6. Enter e-mail address (optional)

7. Click next.

8. Ok, and you're done

A Fully Verified GCash Account assures the legitimacy of your account because of the submission of personal documents to support proof of your identity as well as a selfie scan for enhanced security. Having a Fully Verified account also allows you to access all the features and services of GCash and have increased wallet limits.

Prepare a valid government ID to have you GCash account Fully Verified. To know if your ID is accepted to process your verification, please visit What are the IDs I can submit to get Fully Verified?

Watch our video tutorial on How to pay your Water Maynilad Bill using GCash and please subscribe to our YouTube Channel for more video tutorial.


Tutorial on How to Embed Poll on your Website and Blog

admin 17:44 Add Comment

Poll is a great way on engaging our site visitors. I have tried a lot of poll applications but Straw Poll is one of the easiest and most free polls you can get. 

Straw Poll designed its poll maker to be as easy and intuitive to use as possible. At the same time, they are constantly optimizing the workflow of creating online polls.

Create a poll: Choose a title, a set of answer options and some basic settings.
Share your link: Invite participants by sharing your StrawPoll link.

After creating a poll. Scroll down below to share your poll on Social Media or your blog/website. Click embed and copy the code.

Now go to your Blog and create a new post. Click HTML View and paste your code.

Watch our video tutorial on  How to Embed Poll on your Website and Blog and please subscribe to our YouTube Channel for more tutorials.
.

How to Integrate your Google Analytics to Microsoft Clarity

admin 17:35 Add Comment
Here's the tutorial on How to Integrate your Google Analytics to Microsoft Clarity.

1. Go to Microsoft Clarity Website.
2. Choose Sign-in to Google.
3. Click New Project then Enter your Blog/Website Name and URL
4. Click Add New Project.
5. Select the Project.

You're almost there! Select how you want to install Clarity

1. Install manually: Copy and paste tracking code into the <head> element of your site.
2. Install on a third-party platform: Works with Shopify, SquareSpace, Wix, WordPress, and more.

To start using Clarity, you need access to your website's <head> section to include the Clarity tracking code manually. Each website you add to your Clarity account has its unique tracking code to install.

Browse below at the Clarity Tour and click Google Analytic Integration, Install Manually and Get Tracking Code.

Copy and paste the Clarity code into the <head> element of your site or app.

Once you finish installing the script on your website, Clarity starts collecting the data. You can instantly view data in your project dashboard.

All Clarity features are aimed at helping you find bugs easier. For example, Session recordings give you various ways to filter and drill down to what you are looking for.

Please watch our video tutorial and subscribe to our YouTube Channel @ EGamersCentrum.


Tutorial on How to Redeem Free Data from DITO Telecommunity

admin 17:33 Add Comment
Here's the Tutorial on How to Redeem Free Data from DITO Telecommunity. Rewards includes, DITO Offers, Essentials, Dining, Shopping, Gaming, Digital vouchers and Health and Beauty. DITO Rewards is a loyalty program that allows loyal DITO subscribers to earn and redeem points when they top up, buy promos, or update their rewards profile. These points may be exchanged for a variety of exclusive DITO products and services.

DITO Points may be earned by topping-up, buying promos or simply updating your rewards profile. Watch out for more exciting ways to earn points!

DITO Points earned are valid for one (1) year from the date of crediting. Points will expire every last day of the month.
Example: You earned 20 points on July 5, 2021; these points will expire on July 31, 2022

Step by Step Guide:

1. Install DITO App. 

2. At the left side of View Details, click DITo points.

3. Here you will Discover DITO Rewards. If you want to get free data, choose, DITO offers. 

  • Data 10- !GB All Access for 1day = 10 points
  • 1GB All Access for 30 Days= 12 points
  • 3GB All Access for 30 days= 36 points
  • 5GB All Access for 30 days= 60 points
Watch our video tutorial below and please subscribe to our YouTube Channel.

Tutorial on How to Calculate your SSS Monthly Distribution

admin 17:31 Add Comment
As an employee, you should know how much your monthly contribution to Social Security System (SSS) should be. In accordance with RA 11199, otherwise known as the Social Security Act of 2018. Starting January 2023, the members' contributions will increase from 13% to 14%.

As a member of Social Security System (SSS), this SSS Contribution Calculator will help conveniently compute your monthly contribution.

The calculator uses the latest SSS Contribution Table 2021 for the computation. We are currently limited to computing the contribution for employed members only. Future improvements will be adding other membership categories.

Step 2. Select Employed on Membership box
Step 3. Enter your Monthly Salary
Step 4- Hit Calculate and you will see the Computation Result as shown below.

How to Calculate your SSS Monthly Distribution

Watch our video tutorial on How to Calculate your SSS Monthly Distribution.

How to Check if Google already indexed your blog post URL

admin 17:27 Add Comment
After you post your Blog URL, you will need to ask Google to Index your page by going to Google Search Console. Click URL Inspection and paste the URL for Google to analyze. You can click the Live Test button at the upper right side of the page. Google will then tell you that "The URL is Available to Google", page can be indexed and if the page is usable on mobile and the date and time your page has been successfully crawled. Page URL being crawled is not yet index so you have to request indexing of your page.

Google index page faster than Bing Webmaster Tools. Sometimes when I submit a URL, after a couple of minutes the URL will already be indexed.

To check if the URL that you have submitted has been indexed already, just repeat the process above. Google will then tell you that "URL is on Google", page is indexed and video is indexed if there is a video embedded on your post.

Watch our video tutorial How to Check if Google already index your blog post URL.

Tutorial on How to Compute your Monthly PhilHealth Contribution

admin 16:58 Add Comment
Are you an employee and wanted to know, how much you should be your monthly contribution to PhilHealth?

You can easily do so with the PhilHealth Contribution Calculator.

This PhilHealth Contribution Calculator is a free online tool you can use to easily compute your monthly contribution to PhilHeath.

PhilHealth are using the latest PhilHeath Contribution Table 2021 to derive the right result for you.

2. Enter your Type of Membership (Employed, Self-Employed/Individually Paying)
3. Enter your Monthly Salary
4. Press Calculate and you will see the Computation Result

How to Compute your Monthly PhilHealth Contribution

Note: the contribution is still set at 3% following the announcement made by PhilHealth. Watch our video tutorial and please subscribe to our YouTube Channel.
 

J.CO Philippines now open for Franchising

admin 22:21 Add Comment
How to get a Franchise a J.Co Branch and how much is the franchise fee? Before, J. Co Doughnuts and Coffee only grants exclusive franchise rights to a limited amount of people per country. Now on their Official J.Co Philippines website, there is already a Franchise section which means they are already open for public franchising.

According to ifranchise.ph, latest reports have shown estimated investment costs for franchising:

Franchise fee: $10,000 to $21,000

Total investment cost: $250,000 to $1.5M

With over 300 stores worldwide, J.Co are committed to providing quality products and a relaxing environment within all their stores. If you are interested in becoming a part of J.CO and in sharing the company's passion for excellence, you submit the franchise inquiry form below. 


Franchise Process
  1. INQUIRY
    Submit basic information such as contact, company profile and financial information.
  2. SELECTION PROCESS
    Our potential partner candidate will be asked to submit in-depth background, business plan, and financial information.
  3. LEGAL
    Based upon your submission, we will further shortlist the applicants and invite them to participate in the next phase of the process. The terms and conditions of the contracts will be discussed at that point in time.
  4. PRE-OPENING
    Complete training program, store design, and conduct market campaign.
  5. NEW STORE GRAND OPENING
    Grand opening your own store!

Apply Now

We partner with qualified potential partner who share our passion for J.CO. If you are interested in becoming a part of J.CO please submit a franchise inquiry form below.


J.CO Philippines now open for Franchising

Based upon your submission, we will further shortlist the applicants and invite them to participate in the next phase of the process. The terms and conditions of the contracts will be discussed at that point in time.

Complete training program, store design, and conduct marketing campaign.

Grand opening of your own store!

For more information, you can visit: https://m.jcodonuts.com/ph/franchise